


Hitches and Towing 101
| CHAPTER CONTENTS | |
| 1. Introduction to Towing | 7. Brake Controls |
| 2. Towing Components | 8. Hitch Installation |
| 3. Types of Hitches | 9. Hooking Up |
| 4. Determining Tow Capacity | 10. Tow Bars/Dinghy Towing |
| 5. Selecting Your Hitch | 11. Towing Safety |
| 6. Wiring/Electrical | 12. Preparing Your Tow Vehicle |
Chapter 9
- Hooking Up
When you've got your
receiver, hitch, wiring, and ball all in order, it's time to hitch up your
trailer and go!
Many people have heard horror stories about how hard it
is to back up to a trailer and hook up. In truth, most of these stories have
some truth to them, but the good news is that with a few easy tricks and a
little practice, anyone can hook up to a trailer like a
pro.
Backing Up With a Helper
If you're lucky,
you'll have a good helper to spot for you while you back up to your trailer. If
you're really lucky, you'll get to watch someone try to back up with a bad
helper!
The difference between a good helper and a bad helper is simply whether the helper knows how to pass information to the driver. And whether the helper knows left from right - that's a big factor, too.
Before you attempt to back up with a helper, establish what signals you expect to see. Chances are good that you can't hear spoken or even shouted words, especially if you're backing up in a diesel truck. So you want to be sure that you've got your sign language in order.
Have the helper stand on the driver's side of the trailer, about even with the trailer tongue. Make sure you can see the helper clearly in the side view mirror. The best signs do not involve which way to turn the steering wheel, but rather for the helper to indicate to bring the rear end of the tow vehicle "towards me" or "away from me." Remember, you'll be seeing the mirror image, so you want the directions to be easy to understand.
When you're lined up, have the helper give you some clues about how far you need to go. These can be exaggerated and it's best to err on the side of safety. Countless license plates have been speared by trailer tongues while the "helper" was still indicating a foot to go! Take it slowly and inch backwards for the last foot or two.
Eventually, you and your helper will learn to work together and you'll be the envy of everyone watching. Until then, just accept the humor of the situation and you'll do fine.

Backing Up Alone
Backing up your tow vehicle to the trailer without a spotter is a challenge for beginners. You have to get everything lined up very closely to get the trailer coupler onto the ball. There are a few handy tricks you can use, however. The easiest trick is to bring the trailer to your vehicle, if it's light enough and you have a good surface to push the trailer around. But for those of us with heavier trailers, consider making (or buying) a brightly-colored stick mounted on a magnet. Place the magnet on the trailer coupler and you can easily see the stick through your vehicle's rear window. Some inventive people also put a piece of tape on their rear window in line with their hitch to help them line up. Additionally, there are several products on the market that will help you with aligning your hookup. Most professional hitch installers or online trailer hitch stores should have some options.
When you are lined up and getting close - about a foot away - it's time to stop and take a look. First, make sure to crank up your trailer jack so that the trailer coupler is high enough off the ground that your tow ball will not hit the coupler. That happens a lot, and it's never good.
For the last foot of distance, if you don't have someone watching to tell you when you're on the ball, just estimate the distance you need to move and leave your driver's door open while you back up. It's easier to gauge small distances if you watch the ground. With a little practice, you can back up to your trailer like a pro!
Fifth wheel and gooseneck hitches are fundamentally the same, but because they are located in the bed of your truck, you need to be that much more careful backing up to avoid damage to your vehicle and the trailer.
Are You On The Ball?
When you finally have
your trailer ball under the trailer coupler, you'll need to use the trailer jack
(or a floor jack) to lower the coupler onto the ball. Make sure the coupler is
in the loose position and that the clamp in the coupler has dropped open. These
parts can tend to stick, especially if they haven't been lubricated or used in a
while.
If your coupler clamp has not released, the coupler will come
down on the ball and it will look like it has covered the ball correctly, but
nothing except gravity is holding it on the hitch! This is a major cause of
breakaway accidents, so it pays to make sure. You should be able to feel the
clamp around the bottom of the ball when the coupler is connected. If the clamp
release doesn't come down correctly, that's a big clue that you're not really on
the ball.
 Never ever use a mismatched
ball & coupler to tow a trailer. The difference between a 1 ⅞
inch ball & a 2 inch ball is only ⅛ inch, but it's critical to avoid damage
to the coupler & for a solid hitch
connection. Never ever use a mismatched
ball & coupler to tow a trailer. The difference between a 1 ⅞
inch ball & a 2 inch ball is only ⅛ inch, but it's critical to avoid damage
to the coupler & for a solid hitch
connection. |
Hooking Up Procedure - Weight Carrying Hitch
When you're on the ball, you need to make sure you connect up every part of your hitch. For a towing bumper or standard Class 1 through Class 5 receiver style hitch, the procedure is almost always the same. Study the picture in Figure 9-1 for reference:

Figure 9-1: A properly connected Weight Carrying Hitch
Step 1: Make sure that your coupler clamp lock is down and the release latch has hooked securely. Install a coupler safety pin or coupler lock if you have one. At minimum, make sure you use a coupler pin to keep the coupler lever from accidentally popping open. Completely stow or remove the trailer tongue jack.
Step 2: Check the hitch pin that holds your ball mount in the hitch receiver. You need a hitch pin clip in good condition or use a hitch pin lock to hold the ball mount in place. Makeshift retainers are not safe.
Step 3: Attach your safety chains, crossing them under the trailer coupler. This helps to ensure that the coupler falls onto the crossed chains in the event of a breakaway.
Step 4: Connect your trailer light wiring to your vehicle's connector and check all of your lights, including the brake lights.
Hooking Up Procedure - Weight Distributing Hitch
If you are hooking up a weight distributing hitch, the procedure is a little different, and includes a few extra steps. Study the photo in Figure 9-2 for reference.

Figure 9-2: A properly connected "Round Bar" Weight Distributing Hitch
Step 1: Make sure that your coupler lever is locked down and the latch has hooked securely. Install a coupler lock if you have one. You can leave the jack partially extended for now.
Step 2: Check the hitch pin that holds your ball mount in the hitch receiver. You need a hitch pin clip in good condition or use a hitch pin lock to hold the ball mount in place. Makeshift retainers are not safe. If you connect your breakaway cable to the pin, do it now.
Step 3: Attach your safety chains, crossing them under the trailer coupler. This helps to ensure that the coupler falls onto the crossed chains in the event of a breakaway.
Step 4: Connect your trailer light wiring to your vehicle's connector and check all of your lights, including the brake lights.
Step 5: Jack up the trailer tongue enough to take some weight off the trailer hitch. Insert the spring bars into the weight distributing hitch head and move them into position along the sides of the trailer tongue.
Step 6: Using the lift handle (usually provided with the weight distributing hitch,) move the hook-up brackets that are mounted on your trailer's frame down to connect with the chains at the tapered end of each spring bar. When your hitch was set up, the installer should have told you how many links of chain to count for proper tension adjustment. If not, remember the goal is to be level throughout the tow vehicle and trailer. Using your lift handle, lift the hook-up brackets and pin them into place.
Step 7: Completely lower and stow the trailer tongue jack, allowing the weight to settle onto the tow vehicle.
Step 8: If you have a sway control as shown in Figure 9-3, install it between your trailer frame and your ball mount. This is simply a friction-based device that significantly reduces or eliminates trailer sway.
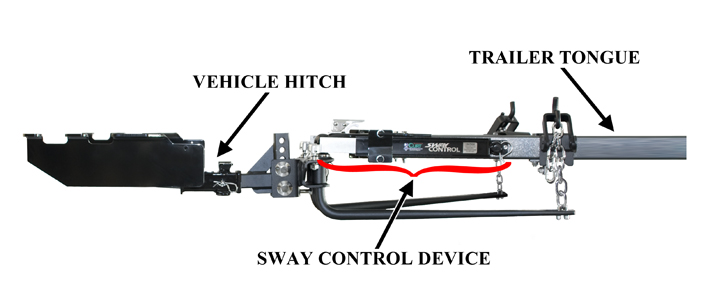

Figure
9-3: Sway Control
Hooking Up Procedure - Gooseneck
or Fifth Wheel Hitch
If you are hooking up a Gooseneck or a
fifth wheel hitch, the procedure is a little different from a receiver and ball,
but it is not more difficult.
Step 1: Lower the tailgate of the truck and make sure that your coupler
is high enough to clear the lowered tail gate and bed of your truck and the
height of your gooseneck ball or fifth wheel hitch. With a fifth wheel, grease
the plates (you can also, and sometimes need to use a nylon lube plate) and then
open the jaws. If you have a gooseneck, open the clamp latch on the Gooseneck
coupler. This would be an excellent time to make sure that the Gooseneck ball in
the bed of the truck is properly lubricated. Nothing will bother you or your
horses more than the obnoxious squeaking of an un-lubricated ball.
Step
2: If you have a fifth wheel, the hitch has a V-shaped opening that will help
the trailer's kingpin find its way into the hitch. When the trailer has seated
in the fifth wheel, the hitch snaps closed and your trailer is attached. With a
Gooseneck, you must position the trailer's coupler directly over the ball in the
bed of your truck and lower the Gooseneck trailer into position and latch
the clamp.
Step 3: Attach your safety chains. These attach in the
vicinity of either kind of hitch. Remember that all trailers are required by law
to have safety chains.
Step 4: Connect your trailer light wiring to your
vehicle's connector and check all of your lights, including your brake
lights.
Step 5: Completely lower and stow the trailer jacks,
allowing the weight to settle onto the tow vehicle.
Hookup
Checklist
One way to be sure you've got your trailer ready to go
is to make a checklist. If you keep this list in your tow vehicle's glovebox,
you can check each item and make sure you're ready to go. You'll want to adapt
this list for your specific towing requirements:

CLICK HERE for printable PDF -
"Trailer Hitch Hookup Checklist"
(keep a copy in your
glovebox)
| << Back to Chapter 8 | Go to Chapter 10 >> |